
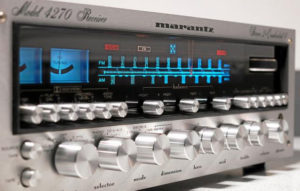
Marantz receivers are probably one of the most if not the most sort after stereo / quad. units manufactured during the 1970’s. They not only sound better then most of the tuner amps of that era but they also have the beautiful “Blue Marantz Glow.” Unfortunately after almost a half century many of the dial lamps / indicators such as stereo, are burnt out or intermittent. Straight up…they are a real pain to replace. For the dial lamps 8 volt fuse lamps are used. If you search Marantz lamps on Google there is a company(guy) who has the correct lamp values for every Marantz receiver. Also, PartsExpress carries the 8 volt fuse lamps (slightly brighter.) They have new modern day led replacements and other new fangled lamps but this post is not about modern day lamp replacements. It’s about replacing those pesky fuse lamps behind the dial. You can get them from the front or you can get them from the back. Both procedures are miserable. if you go through the front you have to remove the face plate, knobs, nuts, bolts, etc. Then you have to remove the dial plastic which is held on by different means depending on which model. Some use screws, glue, brackets, all a combination of all three. When you remove the dial plastic you will rip the light diffuser paper underneath which you will try to salvage the pieces. Now the dial lamps are exposed and can be changed out. Now we have put the unit back together piecing the paper and gluing the dial glass back on. Make sure all the lamps illuminate before re-assembly. And make sure everything is clean when reassembling. You don’t want glue finger prints or other flaws showing through the dial. Ok, the alternative, removing the fuse lamps from the back. This way takes patience and and anti-anger drugs if available, hahhaha. There are usually four screws that have to be removed before the lamp housing can be pulled away and the fuse lamps exposed. One gold screw on each end of the lamp housing and two closer to the middle holding the lamp housing to the circuit board that houses all the indicator lamps. In short all four screws have to be removed before you have access to the lamps. Sounds so easy and straight forward right? Wrong. The wiring is so tight, sometimes the plastic tuning wheel is in the way or a modular cover is sticking out so you can’t move the lamp housing. Or sometimes you can move it but barely can see the fuse lamps. The wires are extremely tight so you have to sometimes cut some of the ties holding everything together. If you have patience and keep your cool you can usually move the lamp housing where you can barely grab each fuse bulb with a long nose pliers, the lamp closest to the left side of the unit is many times total stress to get out and replace. You must be gentle but firm not to rip any wires out since they don’t give you much play. Ok, now to those 6.3 volt indicator lamps, I know the stereo lamp is many times 12volts at 40ma. Been doing this a long time, lol. This indicator lamp circuit board is usually a thin strip above the lamp housing. With a little patience and some more anger management videos you can get it out where it can be maneuvered both front and back. You will need this because the indicator lamps are soldered in. They need to be unsoldered and new lamps soldered in their place. Ok, good enough but here is a tip, through out this whole lamp fiasco make sure your lighted dial pointer is away from where your working. It snaps off easily and is not readily available. You can re-glue it but the light never travels through the glued joint so it’s pointless to repair. Sometime I pick up the whole pointer assembly and move it out of the way, sometimes I just spin the gyro so it is at the opposite side from where I am working. Tip #2, cover the dial cord with black tape. Do not skip this step if replacing indicator lamps. From experience, a lapse of judgement or a relaxed hand holding a soldering pencil will find it’s way to the dial cord and melt right through it. You now have a problem of infinite misery. At this point you need to break out the pain meds, because you not going to restring your Marantz tuner. It ain’t happening. One hundred years ago when I was a little boy I remember a fellow used to make his rounds to all the local radio and TV repair stores. All he did was restring old radios, stereo, etc. that was his function and calling in life. Even the techs and service people in the stores knew better then to mess with the good old dial strings. Even with a dial string diagram(turns,pulleys) and picture it is a exercise in futility. Covering the cord with black tape will protect your dial string from your paw and soldering pencil when your mind wanders somewhere pleasant. And yes, I have developed this electrical tape condom method from my own experiences. Just do it if your replacing the indicator lamp(s). You’ll thank me later. Ok, game not over. Lets put this whole thing back together. You might have to wrestle with the lamp housing and indicator circuit board to get them in to proper positioning. Remember gentle but firm you don’t want to rip those small wires out by the roots. Now you have both the housing and indicator board in position but you realize the little “U” shaped screw holes on the plastic housing are gone, they are snapped off. But you didn’t do that? Of course you didn’t, this thing is forty plus years old and everything is brittle and shows heat wear. BE CAREFUL handling the lamp housing, many times the heat and UV from the lamps over time has weakened the housing to the point where parts of it will just crumble in your hand. Anyway, easy fix, push the lamp housing with the two middle screws which hold the indicator lamp board to it into is correct position. Get GEL super glue, NO not the liquid but the thick stuff that doesn’t drip or flow where you don’t want it to. Screw your two end gold lamp housing screws into the metal chassis even though there is no more plastic U’s on the lamp housing to hold it in place. Sparingly use some of the GEL super glue on the plastic housing and metal chassis it rests on as close to the screw you just inserted that has no function anymore. You can dab the glue in a couple of more spots to hold the lamp housing in place. Don’t use too much glue since you will probably have to replace lamps again some day. Nope not finished, use some strong tape to hold the housing in place while the glue dries. When the glue cures remove the tape. I have replaced hundreds probably thousands of these Marantz lamps over the years. And the one thing I can state, it’s as much fun as ever. Hope this post helps you guys out there in MarantzLand.
Recent Comments